
You guessed it. Another little girl wanted a Frozen cake for her birthday. Who am I to say “NO!” Not happening.
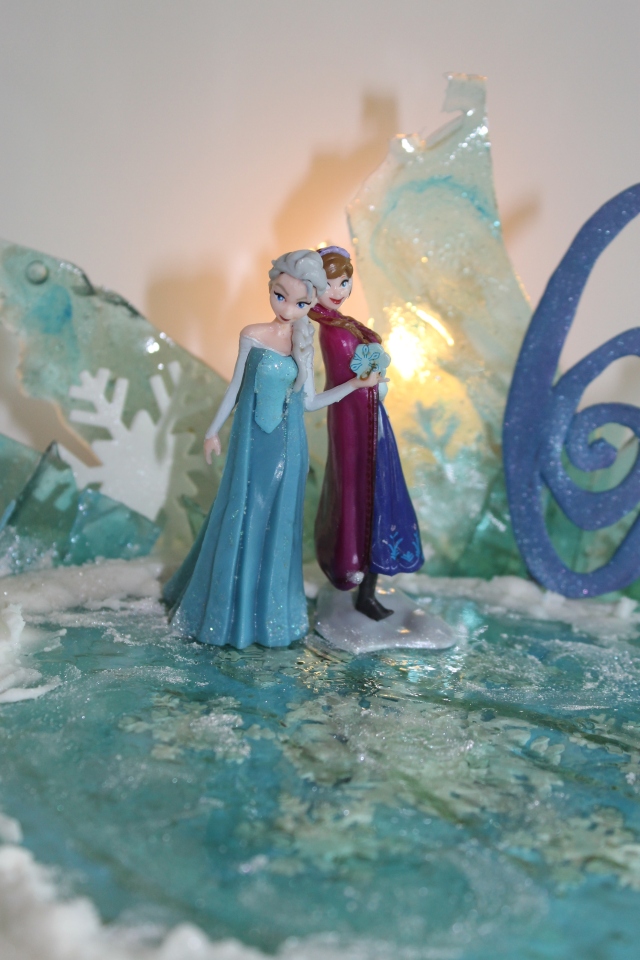
Purchased figurines on the candy pond.

So I gathered up the cake pans, bought more powdered sugar, dug out the hard candy recipe and rolled up my sleeves.
The mommy just wanted a 10″ cake so the cake part was fast and simple. Except for the one that went wonky on me..so another layer was baked pronto. Still not sure what happened but the wonky layer wasn’t a total loss. I froze it to be used later as a filler cake. So now I had 2 layers of cream cheese vanilla cake filled with Malted Strawberry Buttercream.
The hard candy thing took 3 attempts. No idea what happened with that either. Just wasn’t in the stars. Or. I lost my touch. Anyway, the last batch worked and I called it a day.

The next morning, after 4 cups of coffee, I picked up where I left off. I was going for the scene where Elsa is in her ice palace with the snowflake floor. I haven’t rewatched Frozen for some time so that might be wrong. But I do remember the floor. So that was my theme. Sort of.
I made a huge snowflake that ultimately was too big for the ice pond/candy so improvisation was called for. Again. (Note: I should’ve used the big snowflake as it was 1/4″ thick and would’ve kept the hard candy off of the buttercream.)
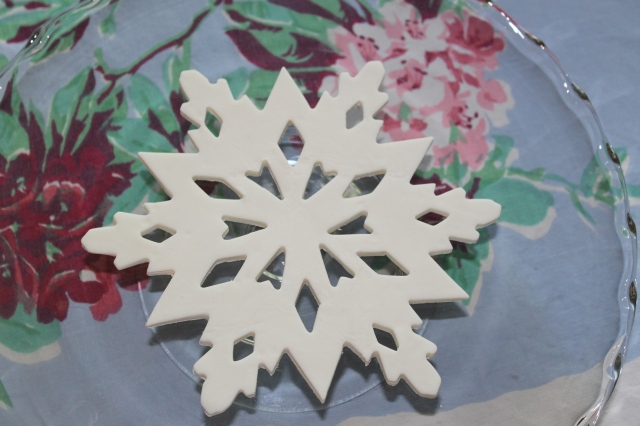
I decided to use one medium snowflake using the tiny ones at each point. The photo might make that clearer??!
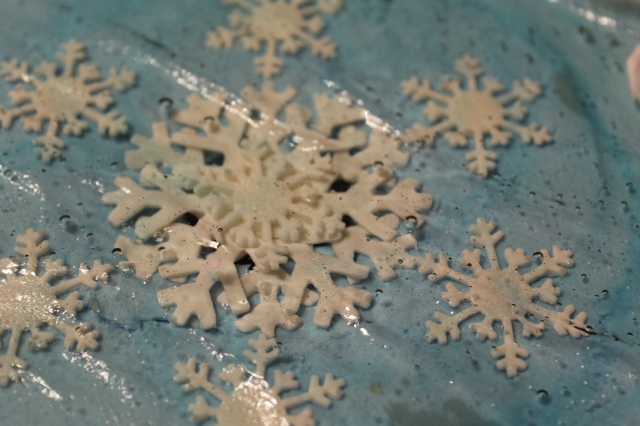
I placed the gumpaste snowflakes onto medium blue buttercream then placed the hard candy ice over it. Yes, that’s a hole in the middle. I cut it out thinking I would place a tea light in the hole but my cake plate wouldn’t do the trick. Planning on having the lumberyard cut a hole in one of my wood cake plates…

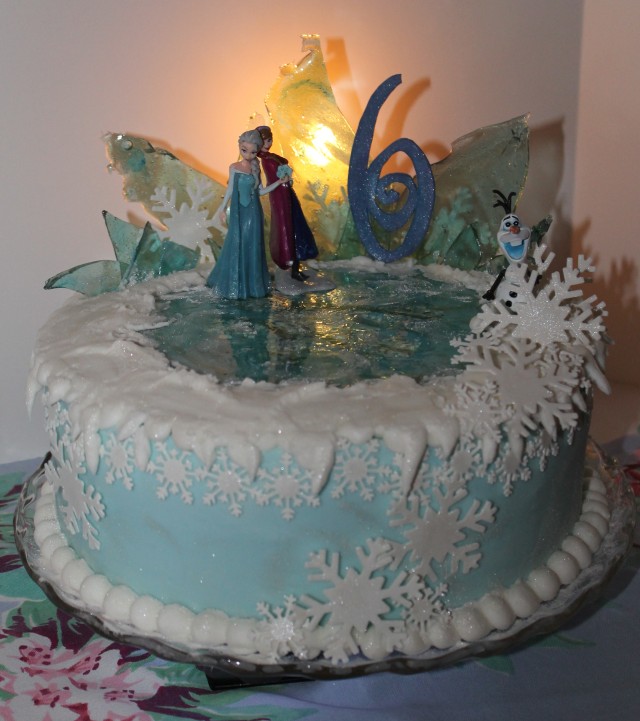 All in all, it turned out, within reason, pretty much like I invisioned it…didn’t sketch it out as I usually do. I ran out of time having just come off a 9 day trip. More on that later…
Things I learned on this cake:
1. When making snowflakes that will have candy ponds resting on them, measure. Carefully. The snowflake should have been smaller OR the pond a bit bigger in diameter.
2. When placing snowflakes on cake that will have candy pond, don’t rush it. The candy will react to the moisture of the cake…perhaps use sugar paste supports might help that little problem and wait till the day of …which is hard to do time-wise.
3. Do NOT place cake in freezer after placing hard candy onto buttercream…condensation is NOT your friend!
4, When inserting the ice shards that stand up at the back, be sure to insert no closer than 1″ from the sides of the cake as the candy will make the cake bulge a bit and may not be as sturdy, re: 10″ cake, go in 1″ from edge for an imaginary 9″ circle. And leave the shards long so you have plenty of candy to insert into the cake for stability.
If given a third chance at Frozen, MAYBE I’ll get it right!!!? Well, you’d think so…..


What a gorgeous cake! It is beautiful as it was, I think we are our own worst critic but seeing the final product I think you should be proud!
LikeLike
ahhh thanks…the birthday girl didn’t care what it looked it like as long as Elsa was on it!! 🙂
LikeLike
I’ll bet your granddaughter was proud of it.
LikeLike
Actually, it was for a friend’s little girl. And she was. proud. Aww, she had her Elsa cape on and nothing else mattered!! Too cute!
LikeLike
Pingback: Frozen cake how to | Everything You Ever Wanted to Know About Country Life
What happened with the interaction with the hard candy and buttercream you mentioned? i.e. does it bleed, get gummy? Thanks for sharing all of this info btw!
LikeLike
Nope. Didn’t bleed and didn’t get gummy. And you’re welcome!
LikeLike
I’m sorry to be a pest but above you said “2. When placing snowflakes on cake that will have candy pond, don’t rush it. The candy will react to the moisture of the cake…perhaps use sugar paste supports might help that little problem and wait till the day of …which is hard to do time-wise.” This is what I was asking about – what is it I need to be careful of? Thanks again!!
LikeLike
Sorry I thought I was answering a question about inserting candy pieces vertically. Wrong cake! The candy on this cake lies flat on top of the cake. The moisture from whatever kind of frosting will “seep” into the hard candy…I’m no chemist but the sugars in each cause this. I think. The trick is to separate them with balls of gumpaste or a gumball/sixlet. Or maybe make a this rope of fondant or gumpaste to place around the bottom edge of the candy pond that will “lift” the candy up a bit, leaving a couple of spaces where air can pass thru. Using a fonadant cover instead of buttercream should alleviate this issue? I’m just guessing as I’ve only done this once! And mine did “bleed” a bit. The drier your cake surface and the drier your candy is, the less likely you’ll have bleeding? Any other ideas out there?
LikeLike
Thank you. That’s what I was worried about. I don’t use fondant really because I think it tastes disgusting. I like the idea of the snowflake under the “ice” – I wonder if I made this out of chocolate (candy melts) if that would provide lift or it it would just cause the same problem since it’s meltable also. Someone really needs to invent yummy fondant.
LikeLike
I agree with you about fondant tasting yucky! Satin Ice does make a Buttercream flavored fondant that isn’t too awful. When I do use fondant, I cover the cake in my buttercream first and then put the fondant over it. That way you can peel off the fondant and just eat the buttercream. The candy melts might work too. Good luck and let me know what you do and how it works?!!!
LikeLike
I definitely will, thanks again for sharing!
LikeLike
Thanks for the inspiration!
I actually made my first fondant cake yesterday as a frozen-cake.
Birthday-girl is happy and I really enjoyed. I would have send a pic but that didn’t work… Only problem now is the sister, who wishes a cake of Dragons-Raiders of Berk….. OMG 😉
Take Care
Nicole (Germany)
LikeLike
I am in a similar situation. My 4 year old daughter wants a frozen castle cake and my 2 year old son loved how to train your dragon…my solution…i will be doing a castle cake half and half. One side will be fully decorated with Frozen teal and Elsa/Anna, the other side will be grey and red with hiccup and toothless. I know it is going to look like a schizophrenic’s birthday party…but hey the kids will be happy! 🙂
LikeLike
Well best wishes on your creation!!! Send a pic!?
LikeLike
Isn’t it difficult to slice the cake with the hard candy on top.
LikeLike
Before you slice, take the hard candy off the cake and lay it aside. Some kid will grab it pronto!!!
LikeLike
How did you keep the 6 standing on the cake?
LikeLike
Several ways to go about this. Make your number out of gumpaste a couple of days beforehand. Once it’s dry, it will be easy to handle…but will still break if dropped. Turn the number to the backside. Put royal icing on a wooden skewer and attach to the back of the number. Let dry several hours. the skewer is then inserted into the cake at an angle or straight up and down. I have also used clear plastic straws and also lollipop sticks. Be sure to leave about 3-4 ” that will be go into the cake. On some numbers….2, 3, 5, 8, 0, I usually use 2 sticks on the sides since you can’t run the stick thru the number’s back without it showing. I have also used melted white chocolate but royal is my preferred glue! Make sense?
LikeLike
Yes it does, thankyou. Also what did you use for the glitter on the 6?
LikeLike
I used Wilton’s glitter dust. You can get it at Hobby Lobby. Use a soft brush and use sparingly! It takes just a little. Good luck and send a pic?!!
LikeLike
Thank you so much. I sent for the snowflake plunger But don’t think it will arrive in time, so i made some some out of royal icing but they just don’t look as nice.So if i do get this done i will take a pic. And again thank you so much for all your help.
LikeLike
Terry…if there’s a Hobby Lobby or Michaels close by, you can find snowflake paper punches to use.
LikeLike
Yes i am going to look this morning . Thank you! Wish me luck, our craft stores are not very well stocked. I will let you know how i make out. It seems anytime i need something i spend a day or two driving all over the place looking for supplies.
LikeLike
I know. Can’t tell how many times I’ve raced 40 miles to the closest Hobby Lobby! Let me know if you need instructions on punching out snowflakes. II didn’t do a tutorial but there’s a pic here: https://therufffarm.wordpress.com/2014/01/13/frozen-cake-how-to/ and we can take it from there! Best wishes for success!!!
LikeLike
Forgot…glitter dust made by Wilton is called Pearl Dust. They’ll be with the color dust so be careful as the packaging is the same!
LikeLike
Four stores later i finally got the snowflake punch, I looked at the pic you sent i think it looks pretty easy . And no glitter dust . They had pearl dust but didn’t get it . i didn’t realize it was the same But i did get some very glittery cake sparkles i thought i could try.
LikeLike
Be sure to roll fondant or gumpaste really thin and let it air dry for 5 mins. or so.
LikeLike
I will. And again thank you so much for all your help:-)
LikeLike
The cake came out awesome. It was a big hit. I’m having trouble downloading the picture for you. Thank you!
LikeLike
You’re more than welcome! Glad it was a hit!!!!
LikeLike